Introduction
At this point, most people in the AI tooling space have at least heard about MCP. Since its announcement by Anthropic in November 2024, the protocol has gained significant relevance across different areas, especially for teams building agent-based workflows.
One of the biggest concerns from the beginning was security. Giving an AI assistant access to data systems sounds great in demos but in production it can go wrong fast if the controls are weak. (Spoiler: That part matters more than the hype.)
More recently, AWS released Open Source MCP Servers for AWS, including the Amazon Redshift MCP Server, and that changed the conversation for me. It stopped feeling like a toy and started to look genuinely useful (at least for real data work) so I decided to try the Redshift MCP Server in my own workflow.
In this post, I share how I implemented the Amazon Redshift MCP Server, the configuration I used, and how it has helped me in my day-to-day data work.
What was I trying to solve?
Before MCP, I was using a combination of tools to interact with my DWH, including DBeaver, Jupyter notebooks, custom scripts and Grafana dashboards. They all worked, but getting simple answers often meant jumping between tools and doing a lot of manual steps. It wasn’t impossible, it just felt archaic.
For example, I regularly ran queries to check:
- The top N longest running queries in the last 24 hours.
- User grants and permissions.
- The health of the cluster.
How it works
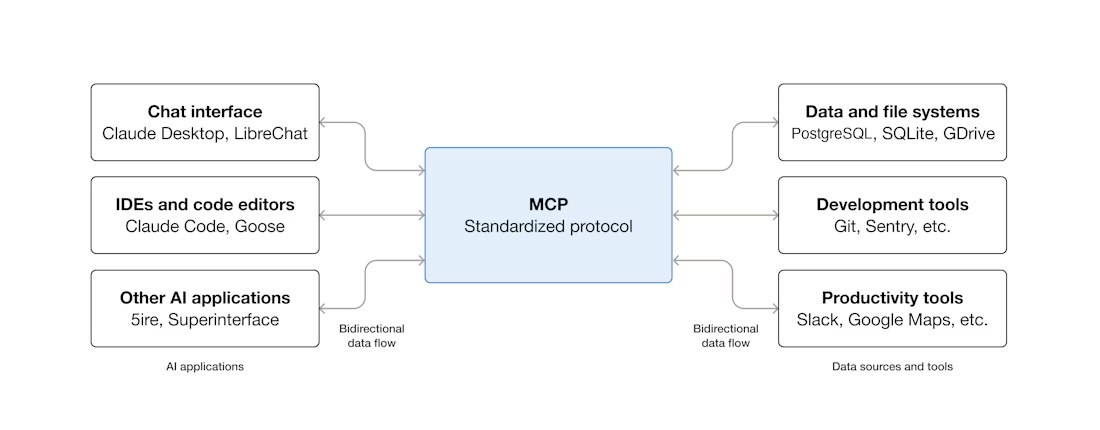
Before getting into the setup, it helps to understand the architecture. Nothing fancy here, but it is worth being explicit.
The MCP server is a lightweight Python process that runs as a subprocess on your machine. Your MCP client (Claude Desktop, Kiro, or similar) starts it automatically when needed. It communicates with the client over stdin/stdout using JSON-RPC 2.0, and it communicates with your Redshift cluster via the AWS Redshift Data API over HTTPS.
┌─────────────────┐
│   MCP Client    │  ← Claude Desktop, Kiro, etc.
└────────┬────────┘
         │ stdin/stdout (JSON-RPC 2.0)
┌────────▼────────────┐
│   MCP Server        │  ← Runs locally, started automatically
│   (Python/FastMCP)  │  ← Uses ~/.aws/credentials
└────────┬────────────┘
         │ HTTPS + IAM Auth
┌────────▼────────────┐
│  Redshift Data API  │  ← AWS managed proxy
└────────┬────────────┘
         │
┌────────▼────────────┐
│  Redshift Cluster   │  ← Your data warehouse
└─────────────────────┘
Configuration (Claude Desktop + Redshift MCP Server)
I followed the AWS documentation for the initial setup, but I kept the configuration simple and focused on a read-only workflow.
Prerequisites
Before configuring the MCP server, I needed a few basics in place:
uvinstalled (Astral)- Python 3.10+ available
- AWS credentials configured
- AWS region configured (
us-west-2in my case) - A dedicated AWS user/profile with the required Redshift and Redshift Data API permissions
I also recommend using a dedicated AWS profile for MCP instead of reusing your default profile.
IAM user and policy (read-only)
For this setup, I created a dedicated user and profile called mcp-redshift-readonly. That profile is the one used by the MCP server.
I attached a custom read-only policy with permissions for:
- Redshift cluster/workgroup discovery
- Redshift Data API read/query execution (
ExecuteStatement,DescribeStatement,GetStatementResult) - Temporary credentials for Redshift access
- Explicit deny rules for dangerous operations (delete/modify/reboot, batch execution, etc.)
- Optional CloudWatch logging for auditing
{
  "Version": "2012-10-17",
  "Statement": [
    {
        "Sid": "RedshiftDiscovery",
        "Effect": "Allow",
        "Action": [
            "redshift:DescribeClusters",
            "redshift-serverless:ListWorkgroups",
            "redshift-serverless:GetWorkgroup"
        ],
        "Resource": "*",
        "Condition": {
            "StringEquals": {
                "aws:RequestedRegion": ["your-aws-region"]
            }
        }
    },
    {
        "Sid": "RedshiftExecuteStatement",
        "Effect": "Allow",
        "Action": [
            "redshift-data:ExecuteStatement"
        ],
        "Resource": "arn:aws:redshift:<your-aws-region>:<account-id>:cluster:<cluster_name>"
    },
    {
        "Sid": "RedshiftStatementResults",
        "Effect": "Allow",
        "Action": [
            "redshift-data:DescribeStatement",
            "redshift-data:GetStatementResult"
        ],
        "Resource": "*"
    },
    {
        "Sid": "RedshiftTemporaryCredentials",
        "Effect": "Allow",
        "Action": [
            "redshift:GetClusterCredentials",
            "redshift:GetClusterCredentialsWithIAM",
            "redshift-serverless:GetCredentials"
            ],
        "Resource": [
            "arn:aws:redshift:<your-aws-region>:<account-id>:dbname:<cluster-name>/<database-name>"
        ]
    },
    {
        "Sid": "DenyDangerousOperations",
        "Effect": "Deny",
        "Action": [
            "redshift-data:BatchExecuteStatement",
            "redshift:ModifyCluster",
            "redshift:DeleteCluster",
            "redshift:RebootCluster",
            "redshift-serverless:DeleteWorkgroup",
            "redshift-serverless:UpdateWorkgroup"
        ],
        "Resource": "*"
    }
  ]
}
Claude Desktop configuration
The setup itself is straightforward. First, configure the MCP server in your MCP client (Claude Desktop in my case) by adding it to claude_desktop_config.json.
{
  "mcpServers": {
    "redshift-dwh-production": {
      "command": "/Users/<your-user>/.local/bin/uvx",
      "args": ["awslabs.redshift-mcp-server@latest"],
      "env": {
        "AWS_PROFILE": "mcp-redshift-readonly",
        "AWS_DEFAULT_REGION": "<your-aws-region>",
        "FASTMCP_LOG_LEVEL": "INFO",
        "LOG_FILE": "/Users/<your-user>/path/to/logs/redshift-mcp.log"
      }
    }
  }
}
A few details mattered for me:
AWS_PROFILEpoints to a dedicated read-only profileAWS_DEFAULT_REGIONavoids region-related confusionFASTMCP_LOG_LEVELand LOG_FILE helped during the first runs and troubleshooting
Once this was in place, Claude Desktop could start the MCP server automatically when needed.
Then added the connector on the Claude desktop
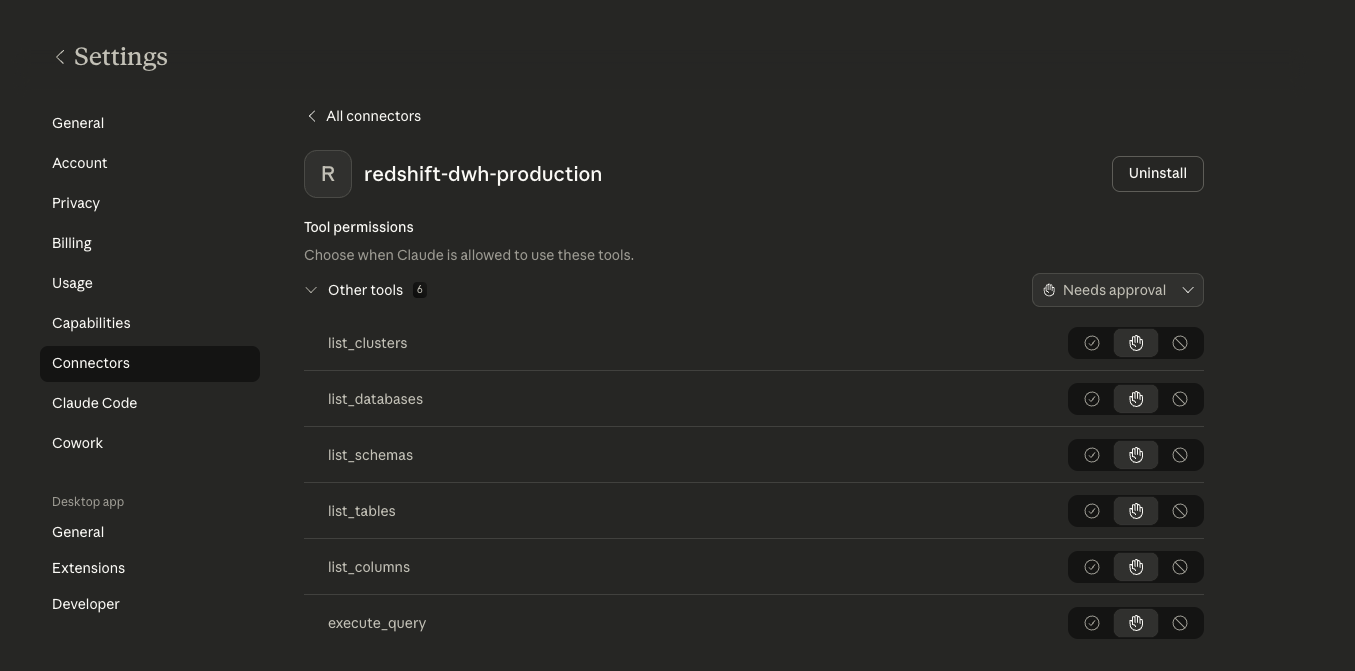
As you can see the MCP Server exposes six tools:
list_clusters, list_databases,list_schemas, list_tables, list_columns and execute_query. As recommendation before running any query, you can just ask what exists. The tool execute_query runs in read-only transaction by default, so even if you ask something that would modify data it won’t.
Database Permissions
In addition to AWS IAM permissions, you need appropriate database-level permissions:
Read Access: SELECT permissions on tables/views you want to querySchema Access: USAGE permissions on schemas you want to exploreDatabase Access: Connection permissions to databases you want to access
What Changed in My Workflow
Going back to the examples I mentioned at the start, checking slow queries, user permissions,cluster health.
Checking slow queries:
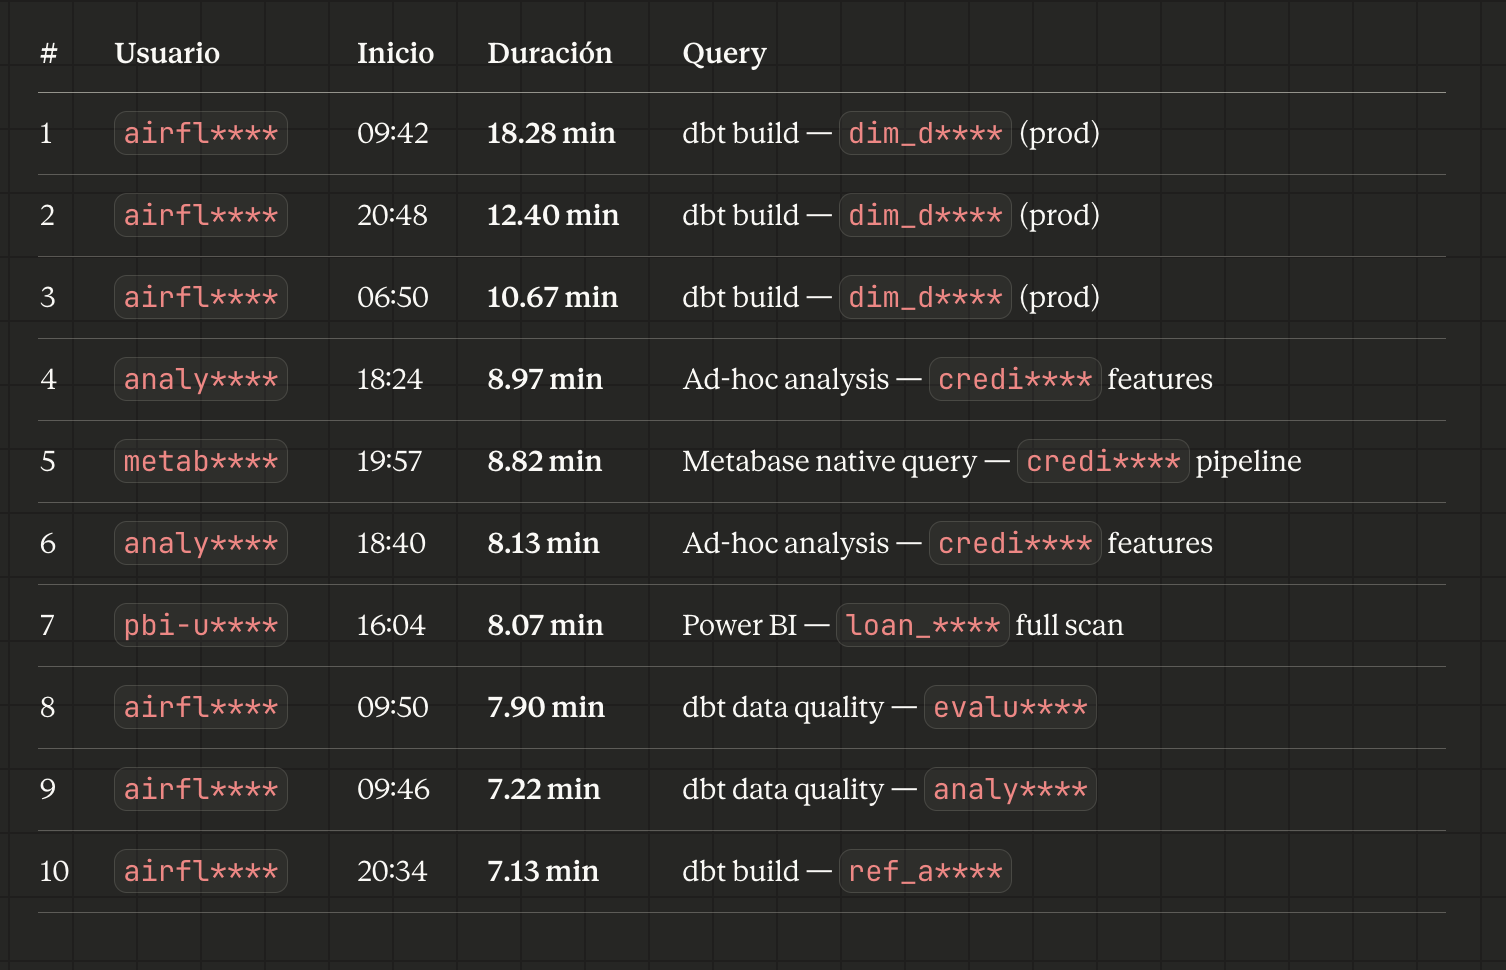
Example: Asking Claude to show the top 10 longest running queries in the last 24 hours
User permissions check:
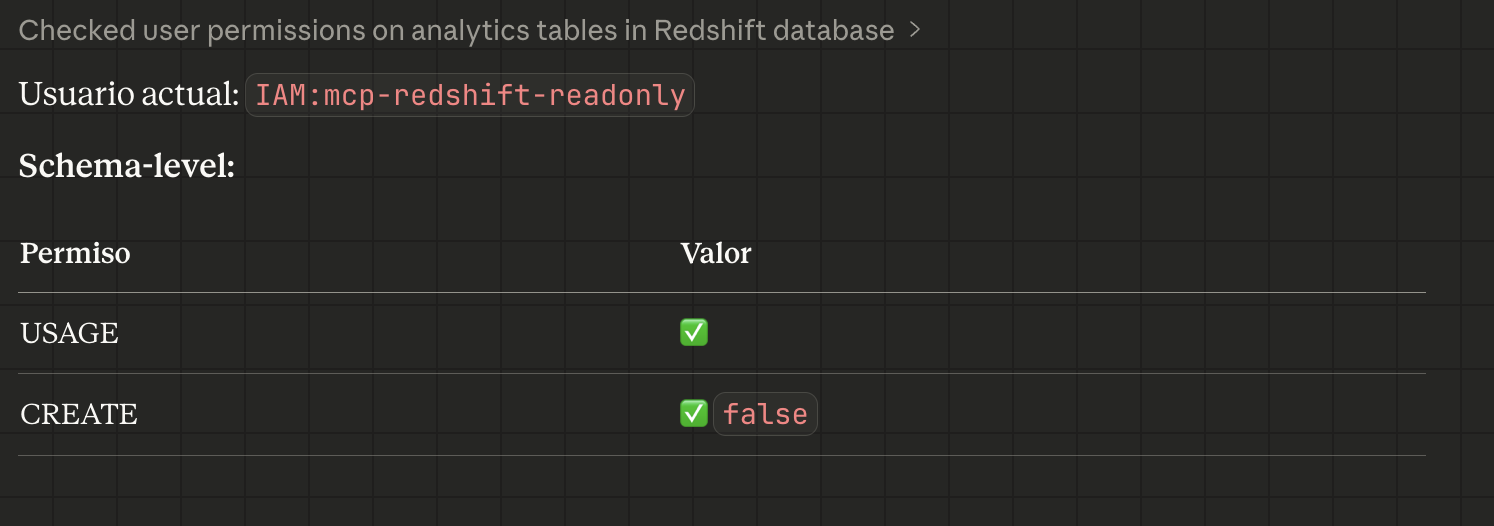
Example: Asking Claude what permissions does the user have on the analytics schema?
Cluster details:
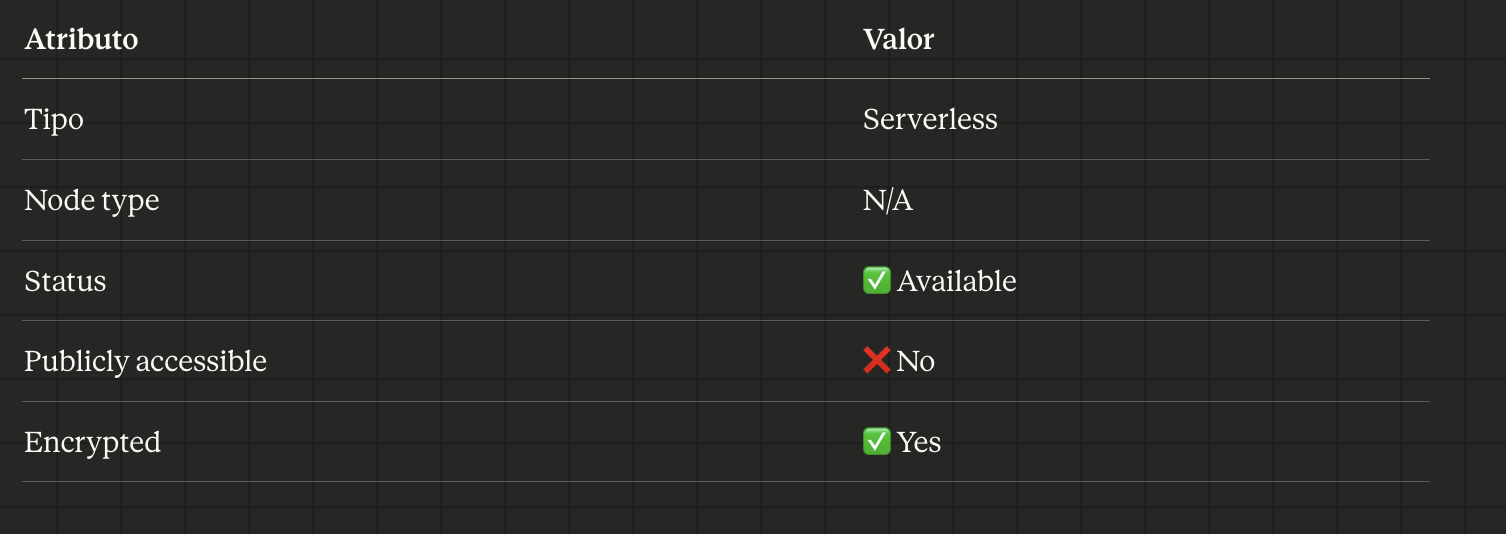
Example: Asking Claude How many nodes does the cluster have and what type are they?
I don’t have to remember the system table names. I don’t have to switch tools. I don’t have to reconstruct a query I last wrote three weeks ago. I just ask.